
Last fall I got a serious craving to make my own quilt. I had resisted for a while because I like projects that I can finish in a weekend (I’m very impatient) and I knew this would be a long process.
And boy has it been l o n g! So long in fact that after constructing the top piece and quilting almost all of it to the batting, I abandoned the quilt to gather dust for a few months while I researched binding (which was the most intimidating part of the entire process!) and procrastinated with smaller projects (and a trip to England!).
A few weeks ago I picked it back up – dusted it off, rolled it up and finished those last few stitch lines. I even made my own binding (store selections are so bland)!
Before I show you my final product, I wanted to give you a little background on how my quilt idea came to fruition..
Inspiration
There are 2 things that really pushed me from dipping-my-toe-into-the-idea to diving-completely-into quilting:
1) I had been following (and admiring) April Rhodes on Instagram for a while and had fallen completely in love with her “Arizona” fabric collection.

{The quilt took me so long that April Rhodes released her second fabric line – admire it here. And just announced her third – sneak peek here.}
2) I hadn’t been a huge fan of most quilt designs UNTIL I saw Taylor Made’s “Briar Rose Quilt” design.

I loved how the vertical strips didn’t line up symmetrically which gave it a more eclectic / less traditional feel. As a first-time-quilter, this really worked out in my favor: the pressure for straight lines and perfect stitches were not a barrier.
In addition, it didn’t require that I follow a traditional pattern. While many would say that a beginner only benefits from following a physical pattern, sometimes I find them intimidating and need to experiment first to prove to myself that I can do it (and next time I should follow a pattern..).
Fabric
I ordered a collection of fat quarters to match the 3 swatches below (my top Arizona collection picks!) from Stitcherie on Etsy. Kristan (Stitcherie’s shop owner) has a beautiful selection of fabric in her shop – which only made my choosing coordinating fabric harder!
![[insert heart-eyed Emojis!]](https://reslicedbyjordan.com/wp-content/uploads/2014/08/rhodes-fabric.jpg)

Once I had the strips stitched, I started to lay them out on top of my bed to come up with my design.
Then…
I realized I didn’t have enough scraps for the size I was hoping to make (this is where following a pattern probably would have helped).
Yes, I could’ve ordered more fabric, but I was on a mission to stay motivated [at least at the time]. So instead I raided my stash and had enough of other random cotton scraps that coordinated reasonably well.
Another life saver: I picked up a bundle of fabric scraps from Allie Mac at the Soda City market last fall. They were a little brighter than my original collection, but I kind of dig the vibrant colors against the muted tones of the Arizona collection.

Stitching
From this point, all the nitty gritty of quilt-making takes place: sewing the top pieces, pressing seams, placing the top piece on the batting, pinning, rolling and stitching (lots & lots of stitching).

I chose to do random horizontal stitches across the entire quilt. It took quite a while and none are straight or evenly spaced 😉 My inspiration for that was from this pin, but my lines look nowhere near as neat (I am a beginner after all!).
Procrastination
At this point, the quilt gathered some dust. We visited England. I did way too much research on quilting. Had a few moments of feeling like a fraud (my only quilting training has been via Pinterest / sewing bloggers / google). Then picked it up, dusted it off and set off on my mission to finish it for good!
Special Details
After constructing the top piece, I embroidered a heart onto the bottom right corner of the quilt using a tight zigzag stitch (remember it from last September?!).

Before adding the binding, I added one last super special detail!

I shamelessly hope this quilt becomes a treasured family heirloom. Because of that, I knew I wanted to add our names so that the future lovers of this quilt would always remember where it came from. My machine can embroider letters, but [to be honest] they are kind of an ugly block print (all capitalized). Instead I decided to hand embroider my last name (Slice) and the Hubs’ (Metcalfe) with a deep purple/wine colored thick embroidery thread. I’m totally smitten with this corner of the quilt because it makes my heart so happy.
Since I wasn’t following a pattern or specific measurements, I laid my quilt out and measured a few different places to try to get it even and then cut straight lines with my handy dandy rotary cutter (remember when I discovered how amazing a rotary cutter is last August?!).
Binding
I chose to do a very scrappy binding using leftover fabric – mostly from the backing.
To figure out how much binding I would need, I measured each edge of the quilt (also as a final check that the vertical edges were the same length as well as the horizontal) and added about a foot. I used that number as the ballpark for the length of binding I wanted constructed before I started sewing it on.
I cut my scrap fabric into strips that were 2 inches wide (for a thin binding) and attached with straight edges (no fancy diagonal attaching here – I read somewhere that wasn’t a big deal and the straight attaching seemed easier because that’s what I’d done with the strips for the top piece so I ran with it).

This tutorial is pretty close to what I followed for attaching the binding (I can’t seem to find the exact tutorial I followed..).
The fabulous part about reaching the point of binding is that you can take your quilt wherever (in front of the TV, on road trips, wherever!) as long as you have your thread, a needle, a thimble (lesson learned the hard way) and a pair of scissors! In fact, a few weeks ago we were in Atlanta staying with my in-laws which is where I added the final stitch.
Final Product
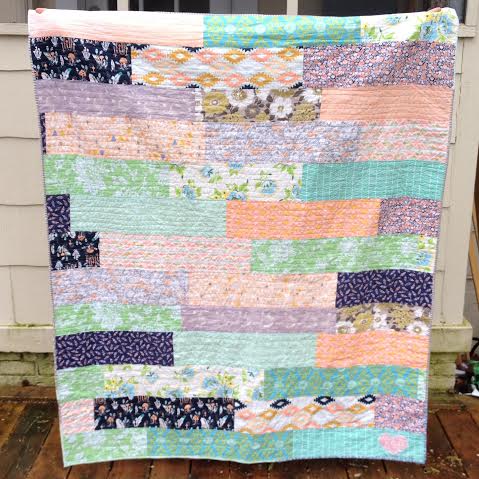
As you can see, there’s no edge to my quilt. Originally I had thought I was going to add a frame around the strips, but I gave up on that somewhere along the way (I really just forgot..). The quilt is roughly the size of a traditional throw – it measures: 52.5 inches wide by 61.5 inches tall.
I have to admit, I get the heart-eyes every time I look at it.
Taylor Made has some great advice and instructions (including lots of pictures!) on how to recreate a strip quilt on her blog if you are interested in trying it out for yourself!
If you’ve ever made a quilt, I’d love to hear the story of your first! I think I’ve gotten the quilting bug – as proof: my growing Pinterest board of all things quilting. And I’m all ears for tips & tricks for my next quilt – leave ’em in the comments below.


Such a cute/smart idea to add your name. I may do the same. Pretty sure i started mine before you and it’s still not finished. Shame shame.
Since it’s not done, go on & add your name!! It’s my favorite little detail 🙂
It’s beautiful! I want to make a quilt for a friend’s wedding- and just like you, never made one and didn’t know about pattern searching/ all the details that go into quilting. Thanks for all your links, they will definitely help me in the process! (I love the Arizona line too!!)
You are such a thoughtful friend!! I hope the links help you! Keep me posted on what you make–I’d love to see it!! 🙂
Jordan I love your quilt, especially the heart and your names. Such a treasure. I really enjoy your blog. I look forward each week to read what you are up to with your many talents.
Thank you!! I’m so happy to hear you enjoy reading my blog! I have so much fun writing it & I always hope there’s someone out there who likes it too! 🙂
Just realized this was you, Ms. Nesbit! I’m so glad you like my blog – that means the world to me! 🙂
I LOVE the name idea!! The sweetest ever! My grandmother for the most part signed and dated all of her quilts…(which is SUCH a blessing when passing them on), but my other grandmother did not. Everyone in the family has a different idea of when it was made etc. they are always conversation pieces when we get together.
Your quilt is beautiful, Jordan! Thanks for sharing it and linking to Stitcherie. I love seeing what people make with fabric from my shop!
Thank you Kristan! Now that I’ve finally finished this quilt, I may be back “in” your shop soon! 🙂
Your quilt is fabulous. My favorite part is the hand stitching with the family name. What a wonderful detail.
Thanks Addie!! 🙂