
I’ve finished my very first #reslicedHappyMail card and I’m so excited to share this story with you!
When I was first thinking of this project, I immediately started thinking of people I knew. I wasn’t sure what the traction would be or if I’d get any submissions at all so I wanted to make sure I had at least one to get started 🙂
Last year, a former coworker shared with me that her Mom had been having some health issues and because she lived alone (and out of town) may be moving into a nursing home soon.
No mother and daughter relationship is perfect and my coworker acknowledged this, but she couldn’t hide the worry and guilt from showing [ever-so-slightly] on her face. Since this conversation, thoughts of her Mom and how she may be doing have come to me several times. The last time just-so-happened to be as I was planning the launch of #reslicedHappyMail – and I knew she’d be the perfect first recipient!
I immediately reached out to my former coworker to check in. Yes, her mother had been moved to a nursing home. And YES YES YES she’d love to have a card. 🙂
After badgering her with a few questions, I knew exactly what I was going to create for her mother.
According to her daughter, Pat’s favorite color is green and she likes patterns you’d generally find on a quilt.
Well…y’all know my love of sewing! {And you may remember that I’m [very slowly] working on my very first quilt}
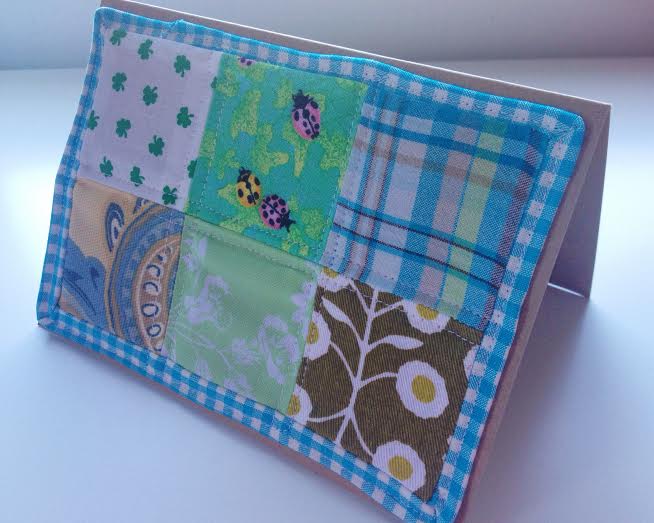
In my mind, I envisioned a quilted card with hues of green.
To get started, I mapped out the pattern so that I could fit this mini-quilt on the front of the card. I used a 3 inch square as my pattern template and cut six different fabric scraps. I pieced them together with a 1/2 inch seam – pressing them open as I went.
The “binding” for this mini-quilt was another story. It was good practice because I’m not quite (but almost!) to that step of my actual quilt. I’ve done a lot of research on how to bind a quilt. The intimidation of this process has kind of crippled my motivation for my actual quilt. The binding of this mini-quilt is far from perfect, but I convinced myself it was okay because it was [obviously] not going to be washed so I think it will hold up 😉
I literally stitched the mini-quilt directly to the front of the card without any trouble from my machine.
Here’s how it turned out:
Last week, my friend Emily hosted a Craft Night. That was just what I needed so I could focus on addressing envelopes to finally send my first piece of happy mail. Since I’ve learned calligraphy, I have a very hard time allowing mail to be sent from my house (with the exclusion of bills) without having the address calligraphied (yep, I made that word up). That being said, there’s quite a production before snail mail actually exits my house and it can often sit around for a bit longer than I intend. Gathering with a few friends last week – all of us working on a different craft – was just what I needed in order to catch up on my address calligraphy.
I used The Lawrence style from The Postman’s Knock for Pat’s envelope. It’s by far my favorite way to address an envelope. It’s easy and it looks so stinkin’ fancy!
 I won’t reveal what I wrote inside, but I’ll admit I tried very hard to brighten this sweet lady’s day! 🙂
In other news, I tried out Julie Blanner’s recipe for homemade oreos in honor of the Hubs’ birthday on Thursday. To be honest, I actually made the red velvet cookie sandwiches without the red food coloring (I substituted water) so that we could have the cream cheese icing filling (YUM).

I even bagged the icing and cut a corner so I could pipe it onto the cookies. Also discovered that we own a wooden roller (who knew?!). So fancy.
Ok, back to the happy mail…
If you know someone who could use a little reminder that they are special, nominate them for a piece of #reslicedHappyMail! Read all about it here.
View all of the #reslicedHappyMail projects here.


YAY! Thanks for sharing!
Thank YOU for the recipe! I can’t wait to make more of those cookies!!
Did you quilt the fabric to the paper? I’ve always wanted to do that!
Yes! I sewed it straight onto the card stock. It was easy–you’ll have to give it a try!