
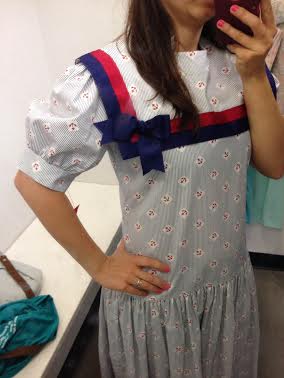
A few weeks ago I hit the jackpot while thrifting. I found this super 80s (though I have no idea which decade it’s actually from) sailor dress that was in perfect condition and just screamed “take me home tonight!” So I did.

I know what you’re thinking: “Jordan, why on earth would you even consider refashioning this dress? It’s like 11 shades of all things perfect!”
Well, friends – here’s my defense:
1. Long dresses are a short girl’s worst nightmare (is it possible for my legs to look shorter?! Oh yes, it is.)
2. My sister’s birthday was fast approaching and I had not even started on that bag I’d promised her (new designs are fun to dream up in your head, but extremely intimidating to actually start so I’d caved to the intimidation…for now). I knew I wanted to make her something special. She loves sailing so obviously she loves anything nautical and THIS was IT.
In addition, my sister had recently started a new job (being that myself, my sister and both our Hubs started new jobs this year, we’ve declared 2014 “The Year of the Slices” – which includes spouses 😉 ). She was transitioning from the classroom to take on the role of a “Reading Coach” at the same school where she’d been planting her roots for the last 5 years. Since she’d be out of the classroom and in meetings a lot more often she’d already started the hunt for more “grown-up” clothes. So I thought: “I can help with this!”
My definition of “grown-up” clothes is a little skewed. Rather than being defined by suits of any kind [I. will. not!] I believe in cardigans. Lots of cardigans! And this was about to be a “just-add-cardigan” outfit!
While trying on this beauty, I realized the back zipper stopped just above the skirt. Meaning: I could easily chop off the bottom and preserve the top without struggling around removing a zipper. Win!
Like any thrifted outfit, I started by washing (because duh) and drying – a recommendation for all fabric you work with. Whether you are chopping cloth off the bolt or refashioning, always wash and dry so that you don’t end up with an outfit for a toddler after it’s first wash.
I used some washi tape to secure the sides of the dress to the door I’d hung it on. It’d probably be better to cut on a flat surface, but I like to bend the rules for my convenience.
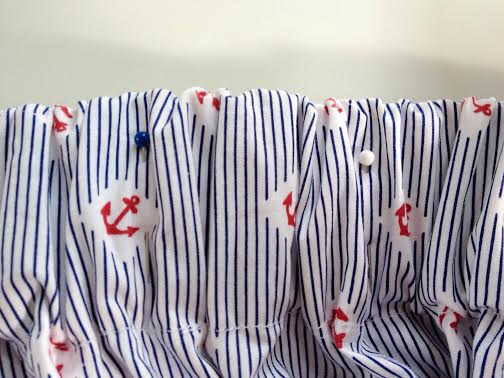
Since I’d decided this would make a super easy (did I mention my sister’s birthday was fast approaching?!) elastic waist skirt that would be a perfect gift for my sister, I started by cutting the skirt off just below the gathered top/waist of the original dress.

This pretty much ends my photographed steps – I’m not so great at documenting my visual progress. However, I loosely followed a tutorial I found a while ago that worked for me – it’s this one from Extra Petite.
I adapted this tutorial a little: I omitted the pockets because my sister always complains they make her hips look too big. If you love pockets and have little hips like myself, include them – they’re fun! I also decreased the width a bit because the first skirt I made following the tutorial was a bit too full for me.
Once I had inserted the elastic waist band, I had my husband stretch the skirt to it’s full capacity. Then I went around it and vertically pinned a few places about 6 inches apart. I used those places to stitch vertical lines so that the skirt wouldn’t bunch unevenly at the waist. Bonus: you can’t see the stitches because of how they fall between the bunching.
And – tada! – the final product of this simple skirt:
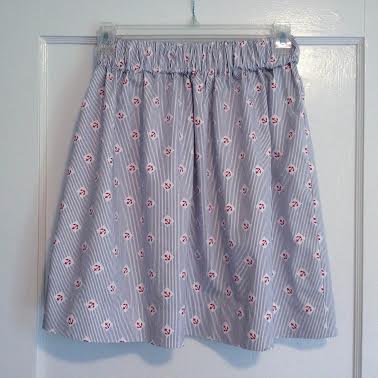
While it is cute on my door and all, it’s way cuter on my sister!


TIP: I have several skirt tutorials pinned on my Seamstress Dreams Pinterest board where I collect all the clothing tutorials I’ll probably never try, but dream about conquering one day. I usually read several tutorials before starting a project like this and combine little pieces from each until I get what I want.
I hope you enjoyed this #ThriftedThursday post!
PS: I’m still working on finishing up the matching top. Keep an eye out for that one – coming soon!
{Catch up on all the Thrifted Thursday posts here.}


So amazing, Jordan!
Thank you Becca! 🙂